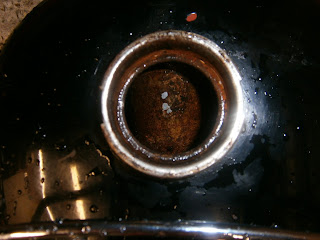
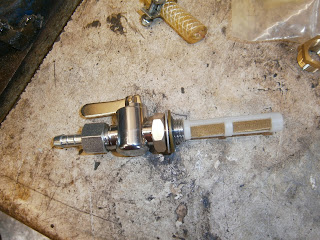
This was a surprise as I had thoroughly cleaned the tank! However I hadn't treated it with rust remover/converter as I usually do so I assumed that this was some missed corrosion that was now flaking off (serves me right for taking a shortcut!). I decided to remove it again and do the job properly. Guess this will also give me more room to fiddle with the tappets and try to decrease the top end rattle- so this is the next job.
Removed the tank- disconnecting the fuel lines- this is where I got my surprise- this "sediment" turned out to be a brown cloudy liquid- presumably water-based as it sank in petrol. A bit of a surprise because I was sure that I had dried the tank thoroughly.- I eventually tracked this down to water that had entered the vented fuel cap during the tank cleaning process- I had forgotten to cover the tank filler hole with plastic before fitting the cap to stop water entering the cap itself (Duuuhhh!). At least this means that the engine isn't about to be messed up by rust particles though. In any event I decided I had better repeat the clean and de-rust the tank properly- felt guilty not having done it in the first place.
So off with the tank- fitting the bungs below in place of the fuel taps and using the Rustbuster Tank-kleen and ball bearings again.
 |
| Bungs blocking off tap holes |
Cleaning was uneventful- for de-rusting I use this stuff Deox C- I got it from Frost restorations and its darned good stuff- Its a harmless white powder that's easily disposed of ...
 |
| Don't put Deox C in your coffee! |
... and I think its active ingredient is just 10% citric acid with maybe a little sodium metabisulphate and/or phosphate added. I will try mixing some up from first principles for next time because citric acid is really cheap! I like to mix up a 10% solution of this deoxC and then make sure that it reaches every part of the tank for at least 60 mins- so I support the tank for an hour in every orientation- treat base for 1 hr- each side for 1 hr and the top for 1hr. Finally I top it up with water and let it stand overnight so that everywhere gets exposed to the more dilute solution.
Below are the before and after pics for the tank filler
 |
| Inside tank after cleaning |
 |
| ... and after de-rusting- much better. |
I got a pair of taps for about £20 and both ethanol resistant- also a bonus.
However- the more observant amongst you will recall that the BSA taps are 1/8 BSP (duuuuh!). Still- even with the necessary adapters, these taps are still about half the price of bronze 1/8 BSP replacements.
The B25 fuel tap - at least in '68, was an all brass affair. The tank base is tapped at 3/8 BSP and into this fits a brass adapter- 3/8 external and 1/8 internal BSP threads. This adaptor also carries the in-tank-filter. The tap screws directly into the adapter and has no filter itself. The tap and adapter are so designed that they seal via flat surfaces both between adapter and tank, and between adaptor and tap. These can be easily sealed with fibre washers.
Later taps (like those I bought) are threaded 1/4 inch BSP on both sides; they have an integral filter, and screw into an adapter in the tank (3/8 to 1/4BSP) but seal onto the thread of the adapter with a locknut and they have no flat flange. I see this as a retrograde step in design as sealing threads is never going to be as reliable as sealing between two flanges. In order to get a good seal on these later taps BSA and Triumph then moved to using the metal reinforced sealing (bonded sealing) washers (aka Dowty washers). These consist of an inner ring of sealing rubber (or rubber-like) material bonded to an outer metal ring. The sealing inner the inner ring can fill in the grooves of a thread and provide a seal.
 |
| New tap, flat and Dowty washers. Note sealing tape on the threads but this should be applied AFTER the washers are seated. |
All of this means that in order to fit these new taps I need a 3/8 to 1/4 BSP adapter and a 1/4 inch nut-and-spigot to link to the fuel pipe below. I will also
Fitting the new tap
These threaded taps can leak- trust me I have had too many leaky taps in the past! I seal them now using a belt-and-braces approach as below.
Put the fibre washer on the tank adapter and apply two turns of PTFE sealing tape. Trim this off at the top and bottom so that its not flapping about in the tank or obstructing the fibre washer. Check the tank base flange is clean and then screw the adapter fully into the tank and tighten.
Push the flat washer and then the Dowty washer onto the tap down to the locknut which should be fully screwed down.
Apply two turns of PTFE sealing tape. I used the yellow gas grade (not sure why) but make sure the tape is clear of the Dowty washer
Screw the tap into the adapter in the tank- it doesn't need to go in fully just a soft contact with the washers.
Position the tap in a convenient position and tighten the lock nut up against the adapter, compressing the Dowty washer making sure the tap doesn't turn out of position. Fit the spigot and nut- this is a taper seal and requires nothing extra to seal properly.
Leak-free seal- job done and very pleased to have two functioning and leak-free taps on the tank at last!.


No comments:
Post a Comment
Usual disclaimers! I' m not a mechanic and these blogs are really just documenting my progress. They are neither a recommendation nor an instruction manual. Just my notes for what I did and how Id do it next time. Im always happy to receive suggestions and corrections to any of the processes described here- hey its a learning process for me too! Feel free to contribute...